A First Attempt at a Friction Folder

friction folder 2

This was a project that I have meaning to do for some time. I actually made the blade about a month ago, or more, but only recently put myself back on task to complete it. I learned a few things along the way that will allow me to be more prepared for the next one that I make. Since I had no intentions of selling this one I just had fun with it and choose to carry it for myself. It is a very simple design, including a blade made from 1095, micarta scales with a leather spacer, and heavy gauge copper wire peened to hold it all together, along with the epoxy bond of the leather application. Folks will ask “Would you stake you life on this knife being durable?” My comment would simply be ” I stake my life on NO knife, but would rather depend on my will to live. ” C’mon guys, every knife doesn’t have to be a batoning machine that you could use to build a log cabin. The copper doesn’t compare to Titanium pins in durability, but then my weakest link would be the micarta. At that pace, it would soon be made of new age metals void of life and organic properties. Not that micarta is organic, but it can bring its own character to the game. It was a fun project, and I look forward to making more with a few modifications I have considered during the process of making this one.

For the DIY Folks Without a Forge

knifekit

So, I’ve been kicking around the idea of selling kits for a while now. A lot of folks would like to make their own knife, but don’t have the equipment or knowledge for making the blank itself, so a kit is a great way to start. As of now, I am just planning to sell the blank and scales, leaving the pins, epoxy, etc. up to the customer. But, if there is enough interest, I may go ahead and stock a few pin options, and will also be making a tutorial video explaining how I would finish the knife from this stage. The blank would come heat treated and tempered with an edge quench like all of my knives. The blade will be acid etched and will also have the JAK logo. I do not quench the tang area, so there is no problems with drilling holes for your pins. The kits will be at the same stage as I build my own that are ready to attach the scales. The photo is generally what a potential customer will be receiving, and it will cost half of what one of my finished knives cost. Eventually I will mark the kits a bit different so that you can tell the difference between one I made, and one that was built by the customer. So, $50 plus shipping, and I will give advice or answer any questions the kit builder may have. Do you think this is a good idea, or not so much? My warranty will still apply to the blank, which is forever for the original owner. I appreciate your input guys.

Another Batch in the Works

Bushcraft Knife

Since I am a one man operation, I make very small batches of  3-4 knives at a time. The photo shows the knives that I currently have in progress, and this is a handy little design indeed. In the photo, the 3 in a row have been heat treated and tempered while the other one is still in need of heat treating.

My intentions are to have 2 of them with tiger maple scales, 1 with olive wood, and one with bacote. I made the blanks from 1/8″ 1095, and gave it a V grind with a slight micro-bevel on the edge. This grind setup will slice about like a full v (scandi) grind, but will have a bit of added strength due to the secondary micro-bevel. I am going with hand peened copper pins on all of them, and I will also add flared lanyard tubing for a nice utilitarian touch.

I am planning to have this batched finished up within the next few days, then it’s sheath making time! I enjoy knife making way more than leather work, so I have been considering hiring out the leather work so that I can stay in “The Zone”. But, that idea feels kinda like cheating to me, and I just like the fact of knowing that I personally made the knife/sheath combo from start to finish myself. The thought of not being in total control of the whole operation doesn’t sit well with me, even though it would be considered progress. I keep hoping that I fall head over heels in love with leather work, but Cupid has yet to pierce me with THAT arrow at this time 🙂

Wild Edibles and Herbal Medicine

foragingbook

Hippocrates once said “Let food be thy medicine and medicine be thy food” and although that may not seem like headline news, the concept should be pondered, at least for a moment. Everything that we need has been provided by the Earth and to think otherwise is just arrogance on our part. Our pharmaceutical companies will isolate what they consider active ingredients, and then market their product to the public with promises of instant health and happiness. HOGWASH!!! There is yet to be a single drug made that improves health, and most pharmaceutics with long term use will give the opposite results. It’s time to take the bull by the horns and educate ourselves on the pure and natural resources that have been provided for us. When utilized properly, these resources WILL bring you health, but not overnight.

Your body is completely capable of healing itself in most cases, if that is the approach instead of treating symptom after symptom with no long term benefits. I can’t think of anything more important than our health, yet the dandelion is considered a weed, and we trust a medical system that has failed miserably at researching natural medicines based solely on the lack of profit. This is huge folks, I mean like “Life or death” Huge. I will give 2 examples: Inflammation and cholesterol.

Current medical trends will treat these 2 topics as something that should be eradicated with drugs to give immediate relief of the problem. Does anyone ever question WHY your cholesterol is high, or why you have inflammation? Perhaps in passing, but for the most part folks just take the drugs and go back to their busy life. But, both of these are symptoms, not a disease. The higher cholesterol is actually active and trying to correct an imbalance, so what do we do? Yep, stomp on it! We have inflammation and joint pain, which is common. So, instead of researching effects of omega 3’s or other natural methods of putting our bodies back into balance we grab some OTC health depleting pain killer and get back to what’s really important………Making money so that we can afford our modern healthcare that isn’t health care at all.

I am going to end my rant here. I am no expert on natural healing, but it is something that I think everyone should have a very strong interest in. It isn’t a hobby, or a social gathering. This is educating yourself on how you can effect and/or change the quality of your life in the long term. I am trying to make this sound VERY important, because it should be our most major concern. It’s our food, our health, or vibrancy…….it is what should be part of us. The book in the photo is one that I picked up recently and I recommend adding it to your own library of edible and medicinal plants. Remember, cross reference and know exactly what you’re dealing with before consuming any wild edibles. No need to poison yourself trying to get healthy 🙂

Vintage Backpack Stoves: More Fun Than a Barrel of Monkeys!

optimus 99

I was recently introduced to vintage self pressurizing backpack stoves by a friend. I would see his posts of the stoves he had and read what he wrote about rebuilding them. I was hooked! First thing I did was hit eBay and start the search for my “new” vintage stove. I actually got what I considered a good deal on the Optimus 99 clone in the photo. I was completely unfamiliar with how they worked, or what to expect. But, with a few simple directions from my buddy, I had the little guy boiling water like a champ! But, the perfectionist in me wanted to make sure it was running perfect. So, step one was to take this little gem apart. That’s when things went south.

For the most part, it came apart very easy, until I tried to take the tube loose from the tank. To make a long story short, it had seized into the threads and didn’t want to budge. So, I carefully tried a little more pressure…..a little more….. and then CRAP! I tore a hole in the tank around the threading which rendered the whole unit useless. 😦

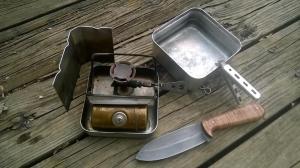
I gotta admit, I was pretty bummed. I may be a grown man, but I almost threw a tantrum when my new toy had broken. So, I get a hold of my buddy and ask if soldering is an option. He replied that he wouldn’t advise it, but he had about 16 tanks, so no worries. Well, he ended up pretty much building me a whole stove and mailed it out to me with in a day or two. What a guy, right?! So, in all actuality, the stove in the photo is an Optimus 8r with an optimus 99 clone case. I like the case also being the cookware, so that’s why this exact setup is what I wanted. Now, he has even went a step further and told me to send all of the parts to the stove I bought, and then he will get it running also, and even provide an 8r case so that I will have 2, yes 2, of these stoves in fully functional condition…….WOO HOO!!!!

If you’re unfamiliar with this type of stove, I will give you a quick run down of the basics, but you can just hit YouTube for more in-depth information. The stove is designed to be self pressurizing. It has what is called a spirit cup, or primer cup, that you fill with fuel and then light it on fire. It will burn for about 2-3 minutes, and the whole time it is heating the outside of the stove which is creating pressure inside the fuel tank. Once enough pressure has built up then you can just crack open the valve and light the burner. It has a very unique “fluttering” sound when it’s running, which is pretty darn cool in my book. It isn’t as fast at cooking other more modern options. But it does work well, and it just screams vintage coolness.

As far as maintenance. this type of stove has very few parts that can go bad. The 2 most common items that would need serviced or replaced would be the fuel cap gasket and the wick. But, for the most part, it’s just a very simple design that has minimal moving parts. It runs on white gas (IE Coleman Fuel) and it burns fairly hot and clean. You just fill the tank about 3/4 full to leave room for air, and then you’re good to go. It doesn’t leak when it has fuel in it, and for having your stove, fuel and cook pan all in this small of a package makes this a great option for cooking on the go.

Now, I have been spoiled by my MSR Pocket Rocket, so when I got this I expected it to function as well as the modern Iso/butane stove…….but it won’t. It is not as consistent, and does not burn as hot. But, it will bring a full pan of water, which is around 5 cups, to a rapid boil in 7-9 minutes. Not too shabby, considering that is more water than I would need to boil at one time in most cases. They do take a bit of tinkering, but once you are familiar with how the function then you will be an old pro at it in no time. My friend has mentioned that they are like old cars, and each has its own personality. But, they are all virtually bullet proof and is a good dependable option for cooking on the trail.

I couldn’t be happier with this little guy, and I look forward to cooking on this thing every chance I get. If this style stove is something that interests you, then just strike out and start collecting some info  and specs so that you can decide which model will fit your needs.

The friend that has been helping me gain knowledge on these stoves recommends the Svea 123. He says that it burns hotter than the 8r and 99 style stove. All of these were made by Optimus, but there are clones out there floating around, and the parts are interchangeable in most cases, so you may be able to save a few bucks by springing for the “Fauxtimus” instead of the real deal. Either way, you’re gonna get a real kick out of using one of these little guys. Good luck, and be safe!

My Experience with Hammock Camping

hammock

The first time I saw a hammock camping setup I was instantly intrigued . I have camped a few times with the setup in the photo since then,  and it’s a great experience that I recommend giving  a try. It a very versatile in that it only needs 2 trees and not much else. This allows you to set up on a hill-side, above brush, over rock, etc. I have even seen photos of folks hanging from cliffs and such. You can count me out on that. 🙂 I haven’t tried it since winter has come, but I will report back when I do. It is important to insulate the underside of the hammock, even in mild weather. The draft that flows beneath you when you’re in the hammock will surely send a chill down your spine…….literally! I am by no means an expert, but I wanted to share what I have learned so far.

On a fair weather outing you can get started in hammock camping pretty easily. All you need is a hammock, and a way to securely hang it. I do recommend some sort of strap for the tree to minimize any potential damage to the bark of the tree. Google is your friend on this one, but Atlas strap come highly recommended from a lot of hammock enthusiasts. Just do your research a bit and you’ll find something that works for you.

Bug netting is something to consider when it is warmer weather, but not a concern in the cooler months. There are hammocks that actually have the bug netting already built-in, or you can just buy a large bug net and “make it work”, which may take some ingenuity on your part. Either way bugs and sleep CANNOT co-exist. It’s just some sort of unwritten law of the universe. 🙂

During the cooler months you may not need a bug net, but you will need more protection from the elements. Again, this will depend on the hammock you buy because models are available that include everything that you could need in a shelter. Hennessy is one brand that has ready to go packages, and while they may look expensive, if you buy all of the gear separately it will become apparent that Hennessy isn’t that expensive after all. One key item that there kits include is a tarp.

Tarps are simply a roof for your hammock. There are different ways to set your tarp up, but the common method and the one I use is running a ridge line a bit above your hammock. How near or far you set it up should be decided by the climate conditions. If it is a beautiful night with little wind you can hang it a bit higher and leave the sides more open to feel the breeze. But, if the conditions are harsh then you will want your tarp close to you when you sleep and have the sides close to the ground for maximum protection.

A very important consideration when hammock camping in colder conditions is how you will stay warm from the underside. There’s a few options like under-quilts, pods, air mattress etc. Your main goal is to create as much insulation as you can between the bottom of the hammock and your body. Down comes highly recommended as an effective insulator, but even the air in an air mattress will give some insulation from the cold. Your clothing and bedding will be about the same as tent camping, so no real concerns there. But I will note that it’s a bit of a chore to get in and out of a sleeping bag when you’re in a hammock. Not a deal breaker, but something to keep in mind.

I could ramble on about hammock camping, but this was just meant to be a primer on the subject. There is a ton of info on the web, so just do the research for what’s applicable to you. And, if you do go out and hang for a night or two let me know how you liked it!

A Quick and Inexpensive “Survival” Kit

5c

The term “5 c’s” is a reference coined by wilderness skills instructor  Dave Canterbury which includes the items that he considers the very basic necessities for a survival kit. The 5 c’s each stand for a different item, and these items are: Container, Combustion, Cover, Cordage and Cutting tool. His theory is that these items are basic essentials that can easily be carried with you, and each item is time consuming or difficult to replicate in the wilderness. I have included a photo of what I consider a simple yet effective way to put a “5 c” kit together that can be fairly inexpensive, readily portable and would work great for storing in your car, at work, etc.The kit in the photo has extra items that you can omit, but it packs up about the same with or without them. Keep in mind that each item is personal preference, so you can mix and match as you feel fit.

Container

For this kit I chose a Swiss volcano stove for my container. It also has a cup and the body is a stove, but the container itself is aluminium and nests inside the stove. Although not necessary, a metal container has advantages over plastic, but the main one in my eyes is the added ability to boil water for purification.

Cover

Next up is cover. I have 2 items that will fall into this category. First being a Poly tarp. You can choose whatever tarp you like, but if making multiple kits then oil cloth or sil-nylon tarps may get a bit expensive. Stting on top of the tarp is a USGI surplus wool blanket. Although not the lightest option, wool has the benefit of retaining most of its insulation properties when wet. This could be a life saving feature in certain scenarios.

Cordage

I went with the old stand and chose a 50 ft. bundle of paracord. It is very strong, and it also will separate into 7 smaller strands that can be used for fishing, making traps etc. Another good option is heavy test bank or set line. It can be found in the fishing section of most department stores.

Cutting tool

Here is another item that I have redundancy of in the kit. Your main cutting tool should be a knife, and that knife should fit the purpose that you intend to use it for. I have included a Mora Companion because they are a good inexpensive knife that excels at fine woodwork. Although the Mora is pretty durable, they are not built for beating around, so keep this in mind when you are putting it to use. I have also included a folding saw, which is a very handy tool for making cross grain cuts when processing wood.

Combustion

It may be hard to see in the photo, but there is a Ferro  rod loop on the Mora sheath and also includes the ferro rod itself. There are many other choices in combustion devices, of coarse. Even something as common as a Bic lighter can be included in this kit, and will serve the purpose just fine. I recommend having more than one method of starting fire, and take the time to practice your method(s) of choice until you completely understand the process.

Once all of your items have been chosen and you have them laying in your  shelter, you can just roll the hole kit up and secure it with a method of your choosing. You can even make a strap of sorts from paracord so that you can carry it over your shoulder, and that will also give you added cordage to your kit.

Conclusion

Thanks for taking the time to read this quick summary of the things I chose to include in this kit. As you can see, the items in the kit can be anything you choose, but make sure to keep in mind the idea of the 5 C’s and cover those first when putting your kit together. Once you have those 5 items in place then you can add anything that you feel may benefit you in a “survival” situation, and don’t shy away from redundancy on any of the items mentioned here in my post.

Stay safe!